
Text Formatting
PDFs may contain several types of data. These include text, raster graphics, vector graphics, and fonts (glyphs). A PDF file does not necessarily contain all the types of data and some PDF files are different from what they seem. For example, a PDF file might look like it has text in it while, in fact, it is only displaying an image that contains text. Text displayed in this fashion behaves differently than regular text when the file is manipulated by the display software.
Text in a PDF is referenced to a specific font and font size. This reference may be to fonts that are enclosed in the file itself or to external fonts that are expected to be available to the rendering software. If the fonts are not available, the output may not render properly. Internal fonts allow the characters to be available. This is discussed further in Section 5 Fonts.
Images (graphics) may be either raster or vector-based. A raster image (also known as bitmapped) is often created by scanning. The resolution of the image (pixel width and height) is determined when the file is created. The rendering software scales the picture based on information in the file. Vector-based images are built with lines and mathematical curves. These types of images can be zoomed in without losing the quality of the image. When a PDF is created from scanned images, the PDF acts simply as a container for the image without any text content inside the file.
In this section, GlobalVision describes best practices when creating text within PDFs.
Ensuring all text is visible
Risk
If you do not ensure all text is visible, erroneous text may appear and/or be detected on final printed materials.
Issues
- Text is hidden instead of deleted.
- Text is covered with an image or another layer to hide it.
- Full transparency is applied to a text layer.
- The text color is the same as the background color.
- Text is overlaid on top of other text.
- Text is hidden and cropped when a text box is used in MS Word.
Example

Solution
Do:
- Name all your text layers so you don’t lose track of them.
- Standardize layer names to simple and clear names.
- Delete all unused layers before creating a PDF.
- Apply a program-filter shadow.
- Avoid using text boxes in MS Word as they don't resize automatically. Instead, use tables or layout options that adjust dynamically to the text.
Don’t:
- Make your text the same color as the background.
- Cover your text with images and graphics.
- Create PDF documents with hidden layers.
- Place live text layers under the background layer.
- Duplicate text to create an effect (i.e. shadows/bold).
Tips
The following steps may be applied in Adobe Acrobat Pro to display hidden text:
- Go to Tools and select Protection.
- Select Remove Hidden Information.
- Ensure Hidden Text is checked off.
- Open the Hidden Text window and check off Show Only Hidden Text.
- Ensure the hidden text does not contain any vital information.
Creating artwork and PDF files with live text
Risk
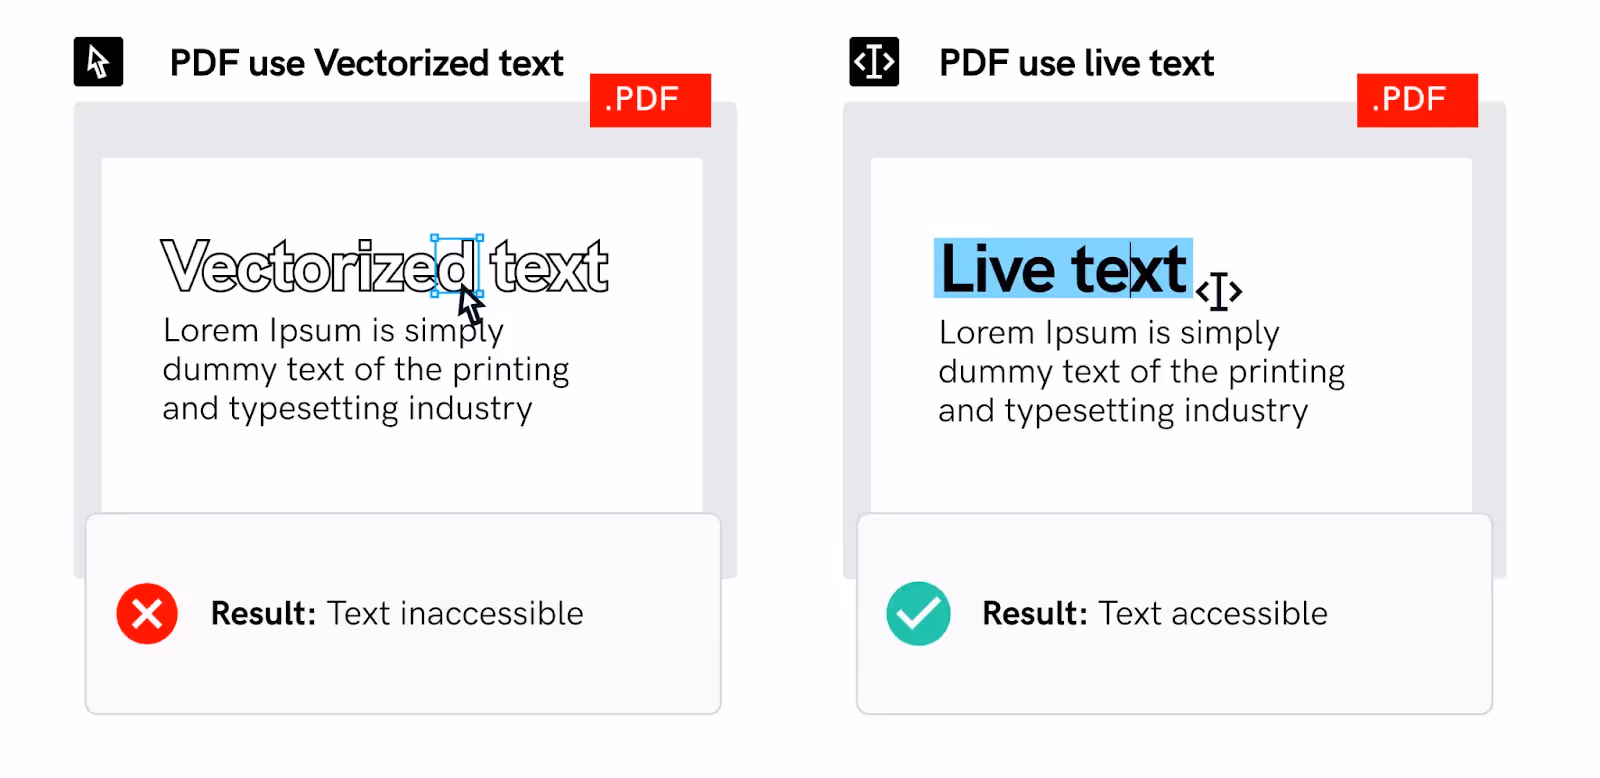
If you do not create PDF files with live text, text cannot be edited and is not accessible on computer systems.
Issue
Outlined (vectorized) or rasterized text constitutes an image and cannot be edited. This type of text has no encoding and cannot be read or inspected by computer programs.
Example
Solution
Do:
- Create PDFs with live text so that text checks of artwork files can be performed throughout the packaging design process.
Don’t:
- Use the Adobe InDesign Transparency Flattener when exporting a PDF. This
process automatically converts text to outline and can affect languages that have special characters or hyphens.
Tips
The following steps may be applied to verify if text is live in a PDF.
In Adobe Acrobat:
- If the document does not have security restrictions, use Test Text Selection.
- You can easily copy text from a PDF document in Adobe Acrobat and paste it into another application or document then verify which text was copied correctly.
- Go to "View" > "Show/Hide" > "Navigation Panes" > "Content."
- If you see a structured content tree with text elements, the text is live.
Placing only visible graphic content in Adobe InDesign files
Risk
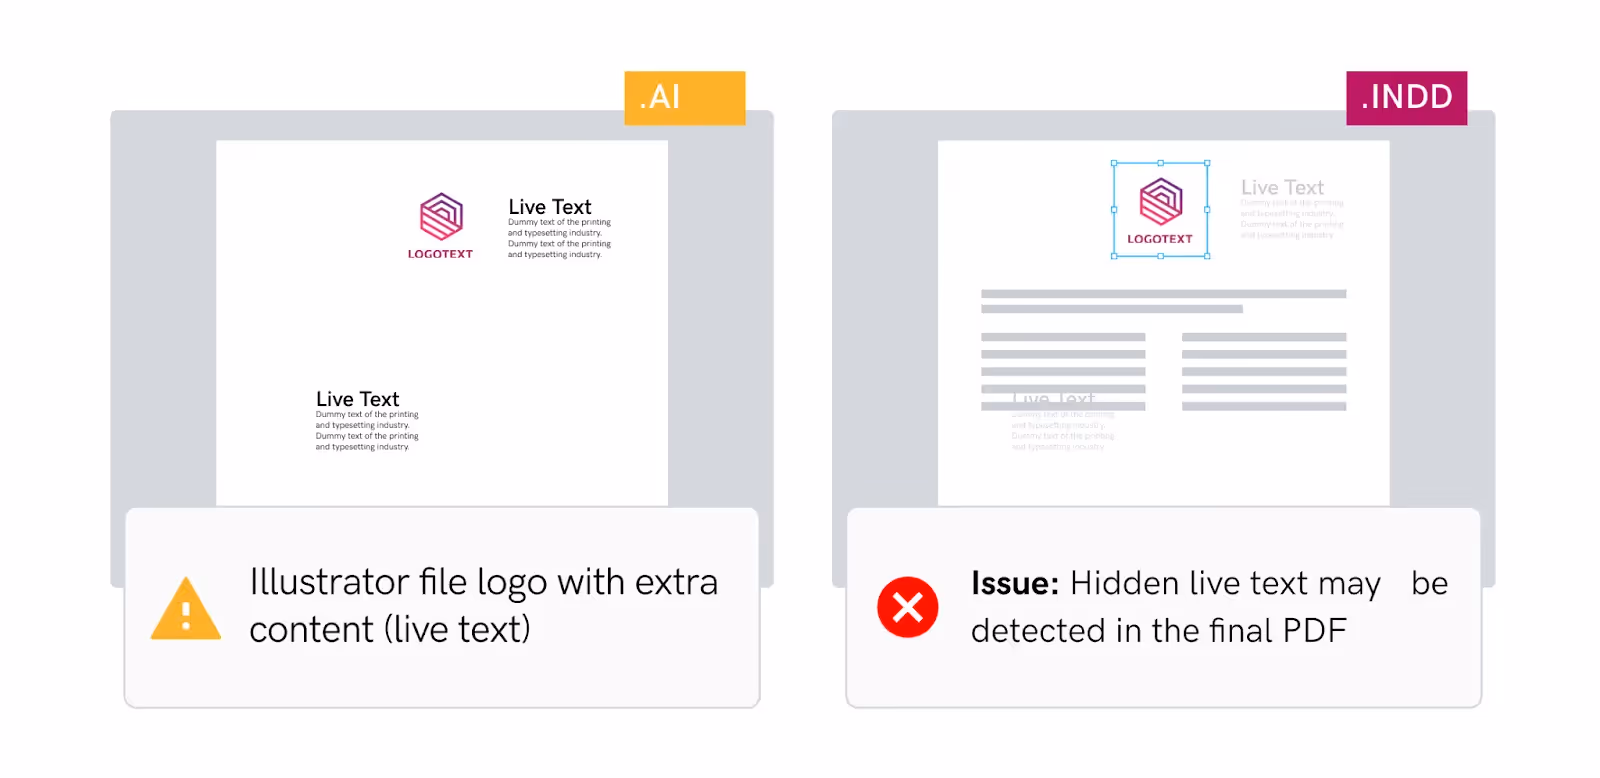
If you only place visible graphic content in Adobe InDesign files, erroneous text may appear and/or be detected on the final approved materials by proofreading software.
Issue
Duplicate text may be detected.
Example
Solution
Do:
- Delete all unused content in Adobe Illustrator before placing it in Adobe
InDesign (live text).
- Verify that there is no hidden text.
Don’t:
- Leave any unused text within linked graphics.
Tips
The following steps may be applied in Adobe Acrobat Pro to display hidden text:
- Go to Tools and select Protection.
- Select Remove Hidden Information.
- Ensure Hidden Text is checked off.
- Open the Hidden Text window and check off Show Only Hidden Text.
- Ensure the hidden text does not contain any vital information.
Using regular and bold fonts for body text and headlines respectively
Risk
If you do not use the appropriate fonts for body text and headlines, the difference between bold and regular font styles may go undetected.
Issue
Using thin or light-style fonts to represent body text with regular styles replacing bold ones in titles and headlines may lead to formatting issues.
Example

Solution
Do:
- Use bold fonts for headlines and titles and regular ones for body text.
- Use a stylesheet to control the styling aspects of the copy in the document.
Don’t:
- Replace regular fonts with light ones.
Tips
The following steps describe how to view information about a given font when
using Apple Font Book on a Mac system:
- Go to View and select Show Font Info.
- Select the font.
- View the font style.
Using fonts with bold or italic variations
Risk
Bold and italic fonts may go undetected by the inspection software if the font
effects are created using the stroke setting.
Issue
False text formatting may go undetected by the inspection software.
Example

Solution
Do:
- Use bold and italic fonts with “bold” and “italic” variations.
Don’t:
- Apply the stroke setting to create a bold effect.
- Apply the skew setting to create an italic effect.
Tips
The following steps describe how to find out the name of a font in a PDF
using Adobe Acrobat Pro:
- Go to Tools and select Print Production.
- Go to Pre-Flight and Select a profile to analyze.
- Click Analyze and verify the results or save a report.
Keeping tracking to a minimum in text formatting
Risk
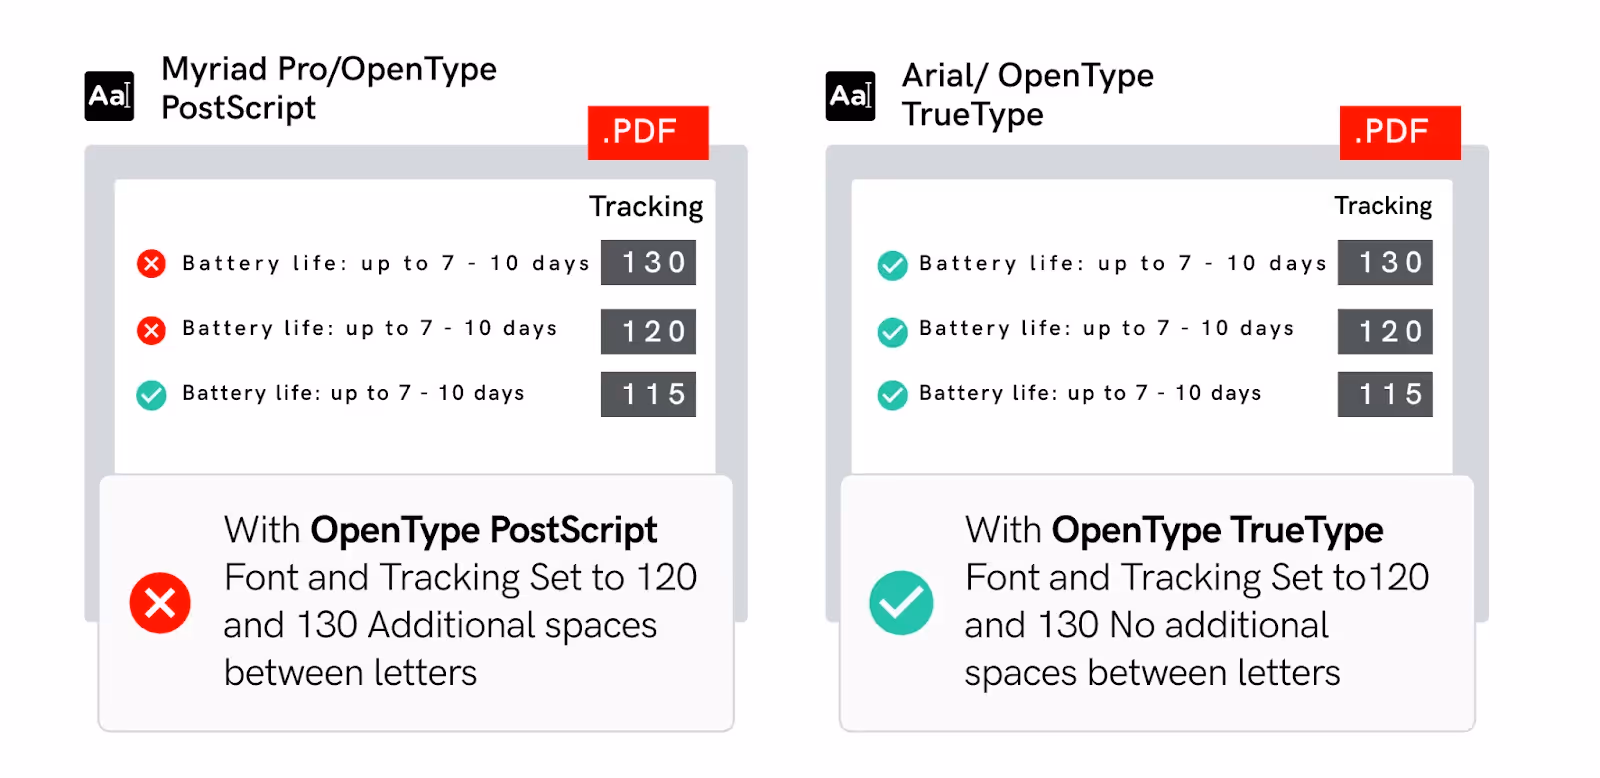
If you do not keep tracking to a minimum when formatting text, unwanted spaces may be detected by the proofreading software on the final approved material.
Issues
- The proofreading software may detect an invalid space when the tracking is set to a higher value.
- Extra spaces between letters may be detected when text is extracted.
Example
Solution
Do:
- Use OpenType Pro fonts.
- Adjust the tracking to less than 120% or keep it at its default value.
Don’t:
- Adjust the tracking to more than 120% when using an OpenType PostScript
flavor.
Tips
The following steps describe how to view information about a given font when using Apple Font Book on a Mac system:
- Go to View and select Show Font Info.
- Select the font.
- View the font type (i.e. OpenType, TrueType).
Placing text in InDesign files by importing Word Documents
Risk
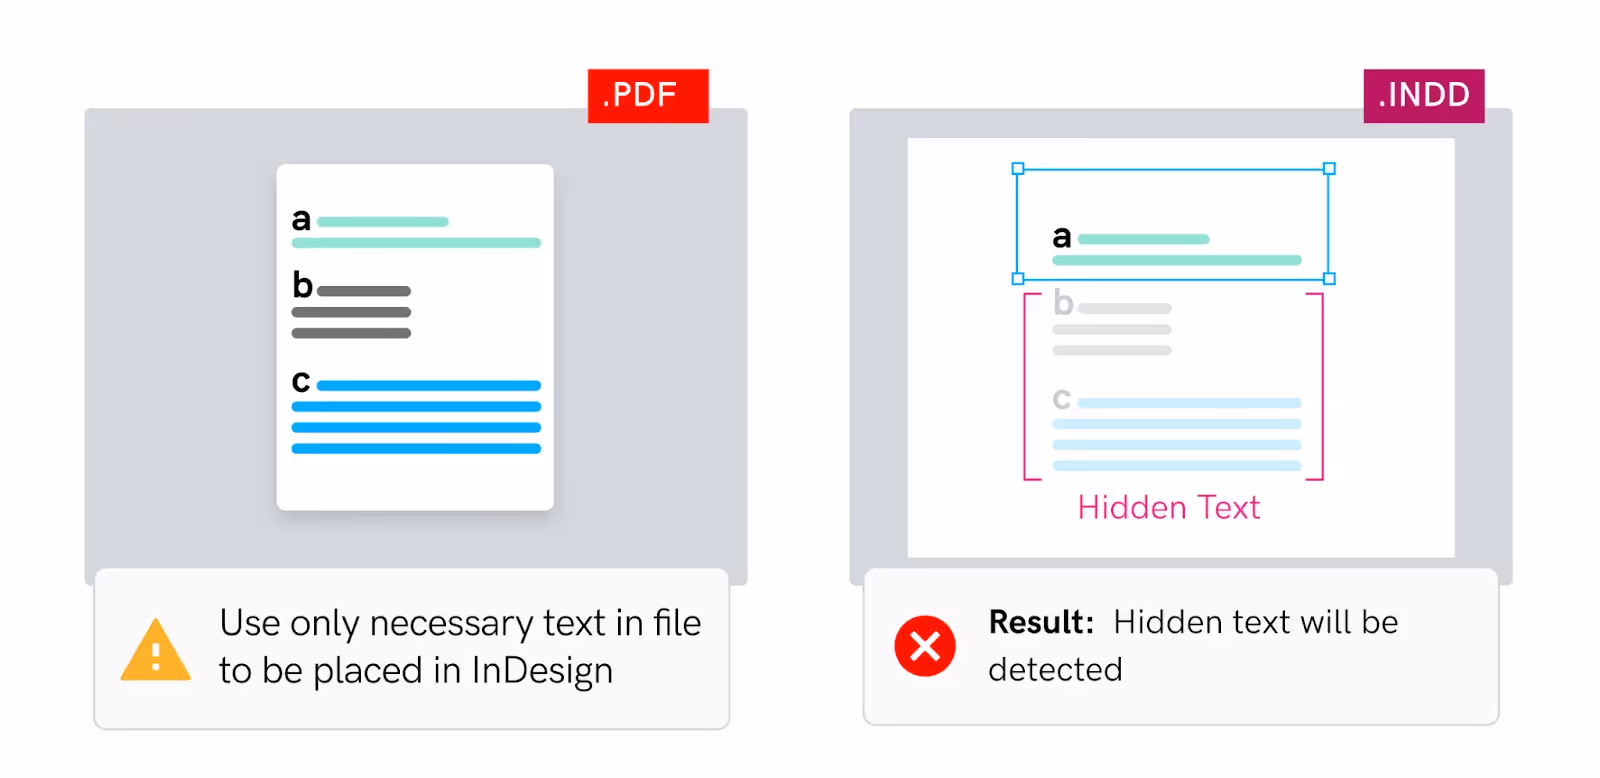
If you do not place text in InDesign files by importing Word documents, inconsistencies may appear in different documents.
Issue
Duplicated text may be detected by the proofreading software.
Example
Solution
Do:
- Use copy-paste text in the InDesign Text frame.
- Import text files directly from Word.
- Import only needed contents into a text frame.
Don’t:
- Place PDF content in the text frame with extra content that is not needed.
- Import PDFs into a text frame and duplicate by reducing the frames.
- Import PDF content already included in duplicated content.
Tips
See Appendix 09 (Unicode Table) List of common special characters Unicode values.
Note: Add text to a document by typing, pasting, or placing text from a word-processing application.
Using the same rule in Style Sheets for both Design and Word files
Risk
If you use the same rule in Style Sheets for both Design and Word files, you will detect erroneous false positives in your files.
Issue
Text extracting may present the wrong Unicode Value.
Example

Solution
Do:
- Use a Style Sheet in the Design and Word processing software.
- Use the same Unicode value with the same value throughout your files.
- Establish the same rules for Superscript and Subscript in both Design and Word processing programs.
- Use list styles to maintain consistent formatting for numbered or bulleted lists.
Don’t:
- Neglect compatibility between Design and Word processing softwares.
- Apply formatting directly to text without using styles.
- Convert bullet to image.
Tips
The following steps describe how to view information about Unicode.
Character Map (Windows) or Character Viewer (macOS):
- To explore and view information about Unicode characters on Windows, you can find "Character Map" by searching in the Start menu.
- On macOS, you can access "Character Viewer" from the menu bar or by pressing "Control + Command + Space."
